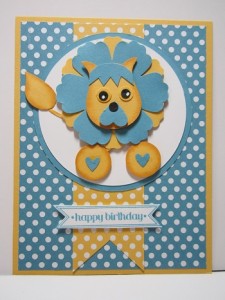
Thanks for returning to my blog! Here are the directions for the card that I posted yesterday – enjoy! This is one of the cards that we will be doing for my Techniques Class on Monday, July 29th from 7-9 p.m. Interested in joining next month? (sorry, this class if full) Email me today to receive my newsletter/class schedule! Or, you can subscribe by using the newsletter sign up in the left side bar of my blog!!!
Supplies:
- Itty Bitty Banners stamp set
- Marina Mist stamp pad
- Daffodil Delight stamp pad
- Big Shot
- Circle Collections Framelits
- Bitty Banner Framelits
- white gel pen
- black marker
- Owl builder punch
- small heart punch
- blossom punch
- bird builder punch
- 3/4" circle punch
- stampin' dimensionals
- sponge
- mini glue dots
Card Stock:
- daffodil delight – cut one piece at 5 1/2" x 8 1/2" and fold in half for base of card
- marina mist dsp – cut one piece at 4" x 5 1/4"
- daffodil delight dsp – cut one piece at 1 1/2" x 5 1/4"
- marina mist – cut one piece at 4 1/4" x 4 1/4" – large circle
- whisper white – cut one piece at 4" x 4" – next smaller circle
- scraps of daffodil delight, marina mist, and whisper white
Step by Step:
- Run the 4" x 4 1/4" marina mist card stock through the Big Shot and using the 3rd from the largest circle framelit from the Circle Collections framelits set.
- Run the 4" x 4" whisper white card stock through the Big Shot and using the 4th from the largest circle framelit from the Circle Collections framelits set. Attach both of these circles together.
- Attach the 4" x 5 1/4" marina mist dsp to the front of the daffodil delight – base of card.
- Tape the 1 1/2" x 5 1/4" daffodil delight dsp to the front of the marina mist dsp – in the center. Attach the 2 circles to the top center of the card and over the daffodil delight dsp.
- Punch out the following from scraps of card stock and assemble as shown in the picture above using mini glue dots:
- blossom punch – cut one daffodil delight and one marina mist – mane of the lion.
- owl builder – cut out the body of the owl from daffodil delight card stock to make the lion's face – brush edges of face with daffodil delight ink and using a sponge.
- owl builder – cut out the small body part (not the main body of the owl) using marina mist card stock. Trim to fit the face of the lion and notching as shown in picture. This is for the tuft of hair on the top of his head.
- 3/4" circle punch – cut out 2 circles for the feet of the lion from daffodil delight card stock and brush edges with daffodil delight ink and using a sponge.
- leaf from the bird builder – cut one leaf for the end of the tail and one stem for the end of the tail using daffodil delight card stock. Brush the end of the tail piece with daffodil delight ink and using a sponge.
- small heart – cut out one for the nose. Color in the tip of the heart using a black marker.
- owl builder – cut out 2 of the smaller circles from the owl builder punch for the eyes. Color in eyes with a black marker first, then use the white gel pen to create the center of the eye.
- owl builder – cut out 2 of the small hearts using marina mist to create the center of the feet for the lion.
- Everything is put together with mini glue dots. Those pieces that use a dimensional are: face of lion onto the blossom punch, the whole lion (blossom punch), and then the feet of the lion.
- Stamp "Happy Birthday" onto a scrap piece of whisper white card stock using the Itty Bitty Banner stamp set and marina mist ink. Cut out using the bitty banner framelits and the Big Shot. Attach to the bottom of the card as shown using stampin' dimensionals.
- Your card is finished!
Need Supplies for this card?! No problem! Just click the "Order Online" button in the top right side bar and it will redirect you to my 24/7 Online Store!!


