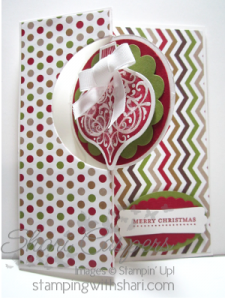
For today's post, I wanted to share a card that I created (I know – it's true!), from my Taste of Convention Expo in September – what do you think?! Please post your comments below – I would LOVE to hear them. This card features our new Thinlits – Circle Card – item #133480 – Woo Hoo!

Here are your step by step directions!
Supplies:
- Ornament Keepsakes stamp set
- Teeny Tiny Wishes stamp set
- Cherry Cobbler stamp pad
- Big Shot
- Holiday Ornaments Framelits
- Thinlits circle card
- 3/8" whisper white taffeta ribbon
- mini glue dots
- 2 1/2" circle punch
- 2 3/8" scallop circle punch
- Wide oval punch
- scalloped oval punch
- Modern Label punch
- 2 way glue pen
- dazzling diamonds glitter
- Stampin' dimensionals
Card Stock:
- Whisper white – cut one piece at 5 1/2" x 6"
- Season of Style dsp – cut one patterned piece at 2" x 5 1/4" and one patterned piece at 2 3/8" x 5 1/4"
- scraps of whisper white, cherry cobbler, and old olive card stock
Step by Step:
- Tape the circle patterned dsp to the left side of the whisper white card stock – make sure that you don't put tape in the middle of the dsp – you don't want this to permanently stick to the card!
- Take the Thinlits – circle card framelit and put it over the 5 1/2" x 6" whisper white card and run through the big shot. Fold on the score line to create an accordion fold.
- Tape the zig zag dsp onto the right side of the card.
- Punch out and assemble the following as shown above:
- 2 1/2" circle punch – cherry cobbler – first layer on the circle cut out.
- 2 3/8" scallop circle punch – old olive – 2nd layer on the circle cut out.
- wide oval – old olive – for the greeting
- scallop oval – cherry cobbler – for the greeting
- whisper white – modern label – stamp "Merry Christmas" first with cherry cobbler ink
- Stamp the pointed ornament (as shown above) onto a scrap piece of whisper white card stock using cherry cobbler ink. Cut out using the corresponding framelit and the Big shot. Attach to the center of the circle as shown above with 3 dimensionals on the back of it.
- Using the 2 way glue pen – add glue to the swirls of the ornament and sprinkle dazzling diamonds glitter over the top. Shake off excess.
- Tie a bow using the whisper white taffeta ribbon – attach to card using mini glue dots.
- Your card is finished!


One of my all-time favorite stamp sets from last years' Holiday Catalog!